
7. The Self-Watering Vertical Vegetable Garden
The moment I realized I was spending $8 on a tiny container of fresh herbs at the grocery store, I knew something had to change. Living in a Chicago apartment with zero outdoor space, I thought fresh vegetables were just a pipe dream.
Then I discovered self-watering vertical systems.
My first attempt was basically a disaster involving PVC pipes, a broken timer, and very dead tomato plants. But that epic fail taught me everything I needed to know about creating automated irrigation systems that actually work.
Installing Irrigation That Won’t Flood Your Kitchen
The key to self-watering vertical gardens is starting simple and building up your system gradually.
I use a basic drip irrigation kit connected to a 5-gallon reservoir bucket. The whole setup cost me about $75 and has been running perfectly for eight months.
Timer controls are absolutely essential. I learned this after manually watering for two weeks and nearly killing my plants from inconsistent care.
Here’s what nobody tells you – install a catch tray system at the bottom. My first setup created puddles all over my kitchen floor.
Use adjustable drip emitters so each plant gets exactly the water it needs. Lettuce and tomatoes have very different requirements.
Gravity-fed systems work great if you don’t want to deal with pumps. Just mount your water reservoir higher than your plants.
Vegetables That Actually Thrive Vertically
After trying probably twenty different vegetables, I’ve narrowed down the ones that consistently produce in vertical growing systems.
Leafy greens are absolute champions. My lettuce, spinach, and kale have been producing continuously for months.
Cherry tomatoes work amazingly well if you provide proper support. I get about 2-3 pounds per plant in my vertical setup.
Herbs are foolproof – basil, cilantro, parsley, and oregano grow like crazy in vertical vegetable gardens.
Peppers do surprisingly well vertically, especially smaller varieties like jalapeños and sweet mini peppers.
Avoid root vegetables like carrots or potatoes. They need deep soil that doesn’t work well in vertical systems.
Maximizing Harvest in Tiny Spaces
Space-efficient gardening is all about thinking vertically and planning succession plantings.
I plant new lettuce seeds every two weeks so I always have fresh greens ready to harvest. This keeps my vertical garden producing constantly.
Companion planting works great in vertical systems. I grow basil next to tomatoes and lettuce under taller plants for natural shade.
Harvest techniques matter – cut lettuce leaves from the outside in, and they’ll keep producing for months.
Succession planting means I’m getting fresh vegetables year-round from the same small wall space.
Use every inch of vertical space. I have three tiers of plants getting different amounts of light and water.
Kitchen Design Integration
The best kitchen vertical gardens look intentional, not like science experiments taking over your cooking space.
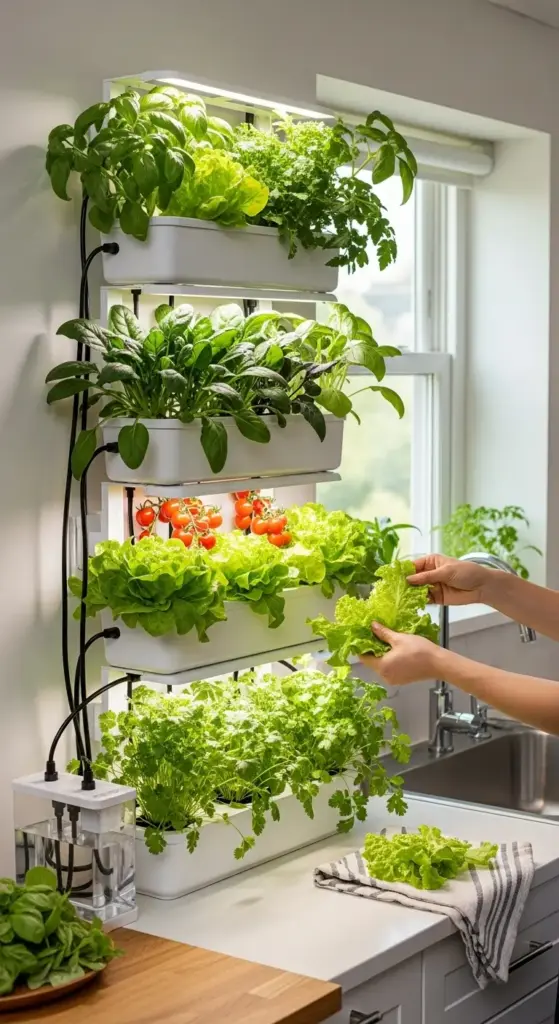
I mounted my system on the wall next to my sink for easy maintenance and watering access. The proximity to water makes everything simpler.
Color coordination with your kitchen matters. I use white containers and black irrigation lines that blend with my modern kitchen aesthetic.
Lighting integration is key – I installed under-cabinet LED strips that serve as both task lighting and grow lights.
Storage solutions for tools and supplies keep everything organized. I use a small cabinet to hide my water reservoir and timer system.
Consider the mess factor. Vertical vegetable gardens can drip, so plan accordingly with proper flooring protection.


Seasonal Planting That Actually Works
Year-round vegetable production requires planning different crops for different seasons, even indoors.
Spring planting focuses on cool-season crops like lettuce, spinach, and peas. These grow well in lower light conditions.
Summer is perfect for heat-loving plants like tomatoes, peppers, and basil. My vertical garden produces like crazy during long summer days.
Fall brings another round of cool-season crops – I plant a second round of lettuce and add kale for winter harvests.
Winter requires more artificial lighting, but I can still grow herbs and microgreens successfully.
Troubleshooting Common Problems
Clogged drip emitters happen regularly. I clean mine monthly with a small wire or replace them entirely.
Algae growth in water reservoirs is gross but fixable. I add a small amount of hydrogen peroxide to prevent it.
Uneven watering was my biggest challenge initially. Some plants got too much water while others dried out completely.
Nutrient deficiencies show up as yellowing leaves. I use liquid fertilizer in my water reservoir every two weeks.
Pest management in indoor gardens usually means dealing with fungus gnats. Yellow sticky traps work great.
Harvest and Cooking Integration
The best part of kitchen vegetable gardens is having fresh ingredients literally at your fingertips while cooking.
I harvest in the morning when plants are most hydrated. Fresh basil in my morning eggs is a game-changer.
Continuous harvest techniques mean I’m picking something fresh almost daily. It completely changed how I cook.
Storage of excess harvest – I freeze herbs in ice cube trays with olive oil for easy cooking additions.
Meal planning around what’s ready to harvest reduces food waste and saves money on groceries.
Cost Analysis That’ll Surprise You
My self-watering vertical garden paid for itself in about four months of grocery savings.
Initial setup cost: $150 for everything including plants, containers, and irrigation system.
Monthly operating costs: About $5 for electricity and nutrients.
Monthly harvest value – easily $40-50 worth of fresh vegetables and herbs.
Return on investment is incredible, plus the satisfaction of growing your own food is priceless.
The indoor vertical farming trend is just getting started, and honestly, once you taste vegetables you’ve grown yourself, store-bought just doesn’t compare.
Conclusion
There you have it – seven designer-level plant wall secrets that would typically cost you thousands to discover!
These aren’t just pretty installations; they’re functional, sustainable ways to bring nature into your urban lifestyle while creating that Pinterest-perfect aesthetic we all crave.
The best part? You can start with just one of these ideas and gradually build your plant wall empire. I always tell my friends to begin with the moss wall – it’s practically foolproof and gives you that instant designer look.
Which secret caught your eye first? Start planning your plant wall transformation today, and don’t forget to share your results on social media. Your friends will be begging to know your “designer’s” contact info!

